Having trust in you’re the NanoSight NTA data produced in the laboratory is a key requirement for scientists, and working within a standard provides confidence. The International Organization for Standardization (ISO) provides ISO standards which are guidelines that are manufacturer agnostic, but are an international agreement between manufactures. In this note, ISO19430-Particle Tracking Analysis (PTA) Method will be discussed, outlining limitations, quantification parameters and instructions on how to operate the equipment in a certified manner to ensure good data quality, whilst providing information and data to substantiate how NanoSight meets the criteria of this standard.
The International Organization for Standardization (ISO) provides ISO standards - guidelines that are manufacturer-agnostic, but are an international agreement between manufacturers. Every manufacturer can produce a set of specifications on how to operate their equipment such that it meets the performance outlined in the standard. In this way, a laboratory can issue certified reports stating that the data they have produced has been generated within, and meets, the criteria of the international standard.
ISO19430: Particle Tracking Analysis (PTA) method describes limitations, quantification parameters, and instructions on how to operate the equipment in a certified manner.
The term 'PTA' is used to encompass the measurement of particles that can be individually measured from their Brownian motion in solution, since the term Nanoparticle Tracking Analysis (NTA) would only encompass a subset of particles - those particles with at least one dimension in the 1 nm to 100 nm range.
ISO19430 is a very important standard for those running a certified lab. ISO19430 documents can be used and implemented in laboratories using PTA equipment for the issue of certified reports on particle distributions in liquids. When a manufacturer of a nanomaterial says that they need a laboratory test to qualify whether or not a dispersion is a nanomaterial, this document is used.
The core equipment used to implement ISO19430 must include the following apparatus:
• Sample cell (with sample in dispersion)
• Laser (or other visible light source)
• Optical microscope (with optical magnification)
• Digital video camera (e.g. CCD or CMOS)
• Tracking and data processing computer
The instrument set-up allows irradiation of the sample (typically by means of a laser beam of wavelength in the visible region) which leads to light scattering by objects with a refractive index that is different from that of the surrounding medium. Light scattered from each particle is collected by magnifying optics and visualized by a suitable detector, such as a Charge Coupled Device (CCD) or Complementary Metal Oxide Semiconductor (CMOS) camera. By recording a series of sequential images, the instrument’s software tracks positions of particles as a function of time, allowing analysis of their Brownian motion and subsequent conversion of motion into particle size.
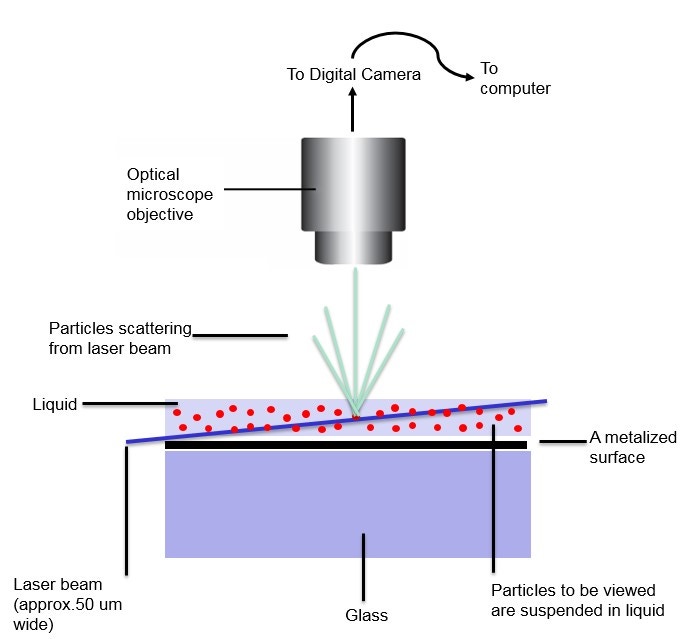
A laser source is used to illuminate particles in suspension. Particles moving by Brownian motion scatter light, and this scattered light is detected by a camera (Figure 1). The software tracks the movement of individual particles from frame to frame in order to calculate the mean square displacement. The Stokes-Einstein equation is applied to calculate the particles' hydrodynamic diameter.

Figure 1. Illustration of the NanoSight configuration showing the sample in liquid suspension illuminated by a laser light source and the resulting light scattered by particles in the path of the laser being directed to a camera.
Simultaneous particle tracking of all particles delivers a particle size distribution, and gives an estimation of particle concentration, in particles/mL. The working concentration range is between 1x10⁶ and 1X10⁹ particles/mL.
Temperature and viscosity values are required to obtain an accurate hydrodynamic diameter. The majority of NanoSight models (LM10, NS300 and NS500) have peltier temperature controlled laser and the temperature is automatically recorded in the software.
The working particle size range is from 10 nm up to approximately 1 µm in diameter in practical terms, and is material- and system-configuration dependent. The technology tracks particles moving under Brownian motion - as particle size increases, the Brownian motion slows down and eventually stops. When the particles are no longer moving randomly under Brownian motion, this technique is no longer suitable. The lower sizing limit is related to the refractive properties of the particle relative to the surrounding fluid, and the sensitivity of the camera within the instrumentation.
Representative sampling is critical for obtaining good data. Tracking enough particles with a sufficient number of tracks will give better statistical presentation of your sample. For a typical number of tracks, please refer to Table 2 in the ISO19430 document. Sample complexity will also influence the analytical precision and the detection of the smallest particles.

Approximately 1 mL of sample is required. The measurement volume is based on 0.1 nL - 1.0 nL. To measure a representative sample, increase the overall volume measured by sampling multiple parts of the sample - this is especially relevant for low concentration samples.
o Maximum sample concentration is 1x10⁹ particles/mL.
o Minimum sample concentration is 1x10⁶ particles/mL for systems with a wide optical field of view.
For measurement precision of a 100 nm monomodal sample, for 400 tracks the CV should be <10%, for 2000 tracks, the CV should be <3%.
For counting efficiency, either automatic or manual thresholding of the minimum number of tracks is required.
Sample viscosity and measurement temperature are key parameters that are required for accurate sizing. In terms of precision for temperature, the accepted range is +/- 3°C.
For measuring the diffusion coefficient, a solid, vibration-free environment is required. Some systems have compensation algorithms in the software, but it is better to have no external vibrations for the measurement.
Counting limits can be influenced by the size of particles. Small particles that do not scatter much light may be too dim and fall below the LOD. If large particles are present, they may be too bright to allow the faint ones to be seen.
Note that it is the number of tracks that is important, not the number of particles. Not all particles in the sample field of view will convert into a particle track.
The equipment used to meet the standard is relatively simple - a sample cell, laser or other illumination source which must be well focused, an optical microscope, camera and computer.
The measurement procedure should be similar to that of other techniques, e.g. DLS.
The instrumentation should allow for several measurements of the same sample to be made in an easy way. As a minimum, 3 repeats must be possible.
For general operation, the instrument should be used in a vibration-free environment. The instrument should be flushed with particle-free diluent between samples. When using saline, flush with water to prevent crystal formation. When not in use, the system must be left clean and dry.
To meet the standard, the acceptable modal size for 100nm polystyrene latex sphere is +/-6 nm (+/- 6%). It is also recommended that a 150 nm polystyrene latex sample is run, where the acceptable size limit is +/-9 nm. In terms of minimum numbers of tracks used to evaluate the sample, see ISO13322-1:2014, which is the standard already used by the industry. The system must report D10, D50, D90 as a minimum.
For size-traceable standards, the acceptable reported size is +/- 6% of the certified size. Key data parameters are D10, D50 and D90. More reliable data will be generated if more particles are tracked. For recommendations on the number of tracked particles, see ISO13322 -1:2014.
Smallest size limits vary with material type. The smallest size for gold is 15 nm, while the smallest sized silica covered by the standard is 75 nm.
| Vol 0.1 nL-1.0 nL; FOV 100 μm*100 μm*10 μm=0.1nL
| FOV 100 μm*100 μm*~10 μm
|
| Representative sampling, repeat sampling | Standard SOP within the software consists of 5 repeats with sample advance, or flow mode with syringe pump |
| Concentration 1x10^6 particles/mL - 1x10^9/mL | Working range of the instruments - 1x10^6 particles/mL - 1x10^9 particles/mL |
| Temperature | Temperature is measured automatically, or manually recorded in datasets. |
| Viscosity | Water viscosity data is the default and is applied automatically. Alternatively, viscosity data can be added before or after data capture/processing. Viscosity is recorded in datasets. |
| No Drift | Drift is automatically monitored within the software. Drift is calculated live during video processing. Drift is reported in datasets. |
| 10 frames/second - 60 frames/second | Videos are captured at 25-30 frames/second. |
| OQ procedure | Utilizes size-verified standards |
| Vibration-free | Vibration is automatically monitored within software. Autocorrection for vibration is applied automatically by software, and warning reported. Recorded within datasets. |
| Cleaning methods | Methods for cleaning the instrument are provided at install. Visual verification of the sample chamber by live image. |
| Standards 100 nm +/- 6 nm | Production specification using 100 nm polystyrene latex, with size range limit +/- 5 nm. |
| D10, D50, D90 | Calculated live during video processing. Reported in datasets. |
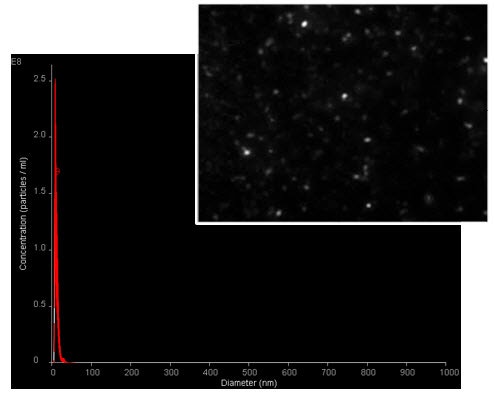
| Gold 15 nm | NanoSight instruments are able to measure 15 nm gold particles, so comply with the criteria, see Figure 2. |
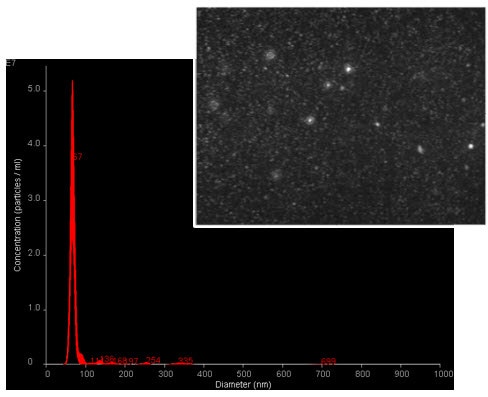
| Silica 75 nm | NanoSight instruments are able to measure 75 nm silica particles, so comply with the criteria, see Figure 3. |

Figure 2. Particle size distribution for 10 nm gold nanoparticles measured with NanoSight NTA.
Inset: Visualization of 10nm gold nanoparticles viewed within NTA software.

Figure 3. Particle size distribution for 70 nm silica nanoparticles measured with NanoSight NTA.
Inset: Visualization of 70 nm silica nanoparticles viewed within NTA software.
The NanoSight NTA product range from Malvern Panalytical meets all the key deliverables for the new ISO standard, ISO19430: Particle Tracking Analysis (PTA). For certified laboratories using a NanoSight instrument, if the instrument is used as described in this document, and the recorded data fall within the limits as stated, the laboratory can claim that their NanoSight data comply with ISO19430.
For more information on this ISO standard please refer to the ISO standard 19430.