
This document is intended to be read by Mastersizer 3000 system administrators. Administrators are defined as people responsible for the security and 21 CFR Part 11 compliance of the instrument. Knowledge of the Windows™ operating system is assumed along with some familiarity with the instrument software.
In order to allow the 21 CFR 11 features to be configured correctly, the software must be installed in accordance with the guidance provided by the Software Update Notification document contained on the software CD-ROM, and the 21 CFR 11 feature key will have been installed. The features described here relate to Mastersizer 3000 v1.10 or higher software. Details of software updates can be found in the Software Update Notification document.
The Mastersizer 3000 software can be secured using the Malvern Access Configurator (MAC) application. This allows Windows users and groups to be assigned to Mastersizer 3000 roles. These roles can be defined by the system administrator.
The MAC application is provided on the Mastersizer 3000 software CD-ROM. It needs to be installed as a separate, stand-alone component. Please refer to the Software Update Notification document for the Mastersizer 3000 software regarding the installation of the MAC. The MAC help file provides a functional description of the applications capabilities. Technical Note MRK1828 provides a step by step guide to configuring a security system within the MAC, and describes the process of exporting security settings to other applications. The Mastersizer 3000 user guide describes how security is enabled for each instance of the Mastersizer software, guidance which is also repeated within the document.
The way in which users and groups are defined for the Mastersizer 3000 application has changed compared to the approach used in previous Malvern applications. In the past, administrators had to set up users and passwords for each installation of the Malvern software. Although this provided the ability to precisely configure the software security system for each installation, it also made it very difficult to share the security configuration between different Malvern systems installed on the same network or within the same company.
In order to allow access permissions to be shared between systems, the MAC utility now relies on the local Windows security system to provide authentication of user names and passwords (figure 1).
|
Control of these is therefore provided as part of the standard IT policies applied at each customer site. For this reason, the Mastersizer 3000 software and the MAC do not provide specific features relating to user and password maintenance, computer lock-outs following inactivity and application access as these are provided by the Windows operating system via the domain policy implemented by the local IT department. The advantage of this approach is that the roles accessible by different users can be set up once, and then applied to any Mastersizer 3000 installation running on the same network.
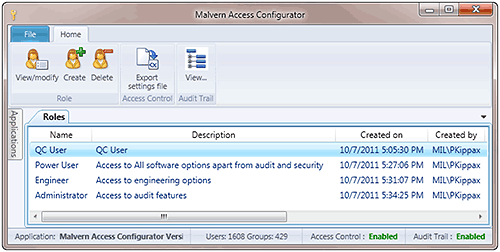
The MAC application allows different roles to be defined for users of the Mastersizer 3000 software (figure 2).
|
Roles are constituted by sets of permissions to perform functions. By grouping permissions to perform functions into logical role types it is then possible to then create intricate layers of security control within the system. For example, all those users having the "Basic User" role might be able to run measurements, but not edit records. Similarly an "Intern" role might be able to access reports, but not run measurements.
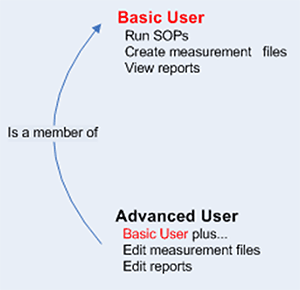
The way roles can are defined is very flexible. Administrators can define very simple roles, within which the members only have limited software access. However, it is also possible to assign roles as being members of other roles. For instance, an Advanced User might have a set of specific high-level permissions that have been individually assigned, yet they still need to be able to perform the functions of a Basic User. In this case it is easier to assign all Basic User permissions to the Advanced User role by making the Advanced User "a member of" the Basic User role (figure 3).
|
This saves time in structuring your security hierarchy and also makes it easier to keep lists of permissions for a role up to date (i.e. you only need amend the core role that holds those functions, in this example the Basic User role, to know that the Advanced is also up to date).
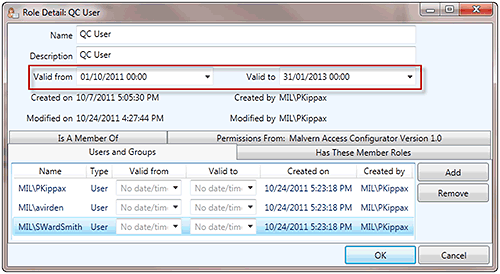
The period of time over which a role is active can be set within the MAC application (figure 4). This enables roles to be created for short time periods if required, for instance to allow the completion of a specific project by a group of users.
|
The Mastersizer 3000 user actions associated with each role can be configured to provide the level of access required (figure 5).

|
Permissions are grouped into the following sets:
Administrators can set the validity period for each permission assigned to a role. A complete list of permissions, which can be used in setting up roles for the Mastersizer 3000 software, is provided in the appendix of this document.
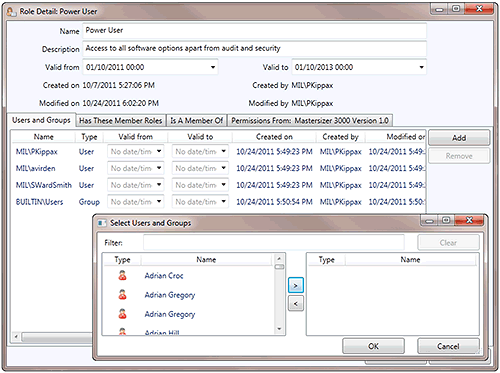
The final part of configuring the Mastersizer 3000 security system is to assign different users to each of the roles which have been defined within the MAC application. The list of available users is obtained from the local Windows network. The MAC application is able to assign either specific users or user groups to each role. In addition, a validity period can be set, defining the period of time over which each user or group has access to the capabilities of the role which is being configured (figure 6).
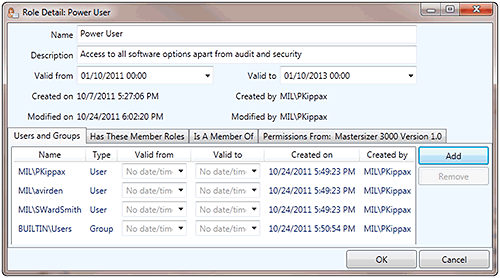
|
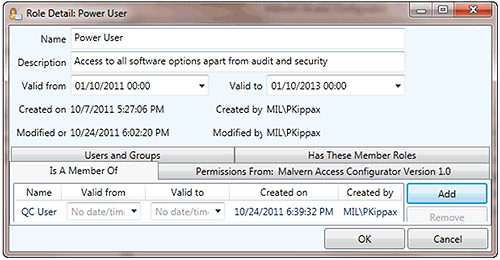
In addition to allowing different Windows users and groups to be assigned access to a role, it is also possible to assign the permissions of a given role to other roles within the MAC application. This is configured using the 'Has These Member Roles' tab within the Role Detail setup dialogue (figure 6). All roles listed within this tab will inherit the role's permissions. In addition, it is possible for a role to obtain permissions from another role which is already defined within the MAC application. This is configured using the 'Is A Member Of' tab within the Role Detail setup dialogue (figure 6). The role being configured will inherit permissions from any role listed within this tab. An example of this is shown in figure 7: here the Power User role has been set-up to inherit all of the permissions associated with the QC User role.
|
Depending on your local validation requirements, it may be necessary to control access to the MAC application, and also audit any changes applied to the security configuration for the Mastersizer 3000 software. Full details of how this is achieved are provided in Technical Note MRK1828.
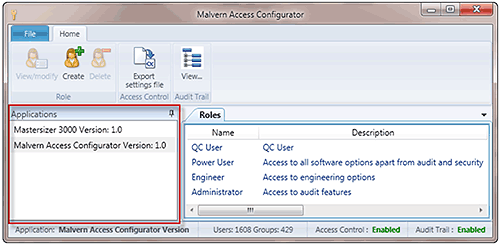
Access control for the MAC application is set up using exactly the same approach as is described for the Mastersizer 3000 application above. All that is required is for the permissions associated with the MAC application to be imported into the MAC software. Administrators can then select the MAC application within the interface, and can then set up specific roles (figure 8).
|
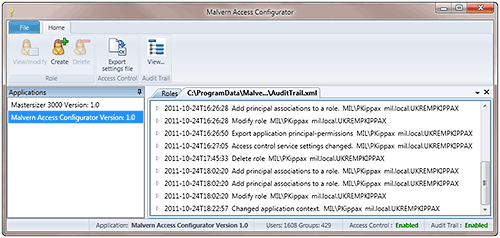
In addition to this, an audit can be enabled for the MAC application. This provides information on any changes which have been made to the security configurations associated with any application currently controlled by the MAC (figure 9).
|
The security settings are transferred between the MAC software and the Mastersizer 3000 software via a secure settings file. Full instructions on how to achieve this are provided in the MAC application help, within Technical Note MRK1828 and also within the Mastersizer 3000 User Manual. The security system can only be enabled by users who are administrators on the computer running the Mastersizer 3000 software.
The Mastersizer 3000 security system is available for all systems users. However, the software also provides a set of specific 21 CFR 11 features, access to which is controlled using a feature key. These options are available via the program Options, accessible from the File menu tab.
To enable 21 CFR 11 mode, select the 21 CFR Part 11 section from within the Options dialogue. You will be prompted to enter a valid 21 CFR 11 feature key for your system, if this has not already been done for your software installation. Once this has been successfully entered, the audit and electronic signatures options will become available for you to enable. You must be an administrator on the computer running the Mastersizer 3000 software in order to enable these options.
When 21 CFR 11 mode is enabled, the Mastersizer 3000 software can be configured to store an audit trail of key record creation and editing activities using the Enable Audit option in the 21 CFR Part 11 section of the Options dialogue. When enabled, the audit information is stored in two distinct audit trails:
These audits can be accessed using the System and Records options available within the Review ribbon bar. A summary of the audit capabilities is provided here - please refer to the Mastersizer 3000 user manual or help file for more information.
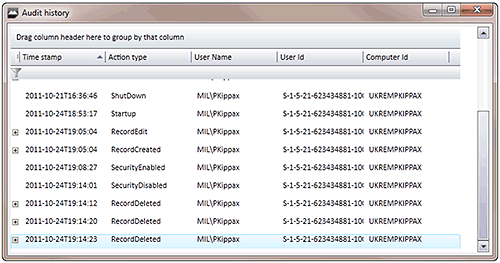
The system-based audit trail keeps track of all user activity which cannot be associated with specific records within a measurement file. This includes application start-up / shut-down, initial record creation and record deletion. Other system activities, such as the activation of the security system, are also logged (figure 10).
|
For each audit entry, the time of the audited action is logged along with the user and computer details. In addition, further information can be obtained for each action. So, in the case of record creation, the name of the measurement file within which the record is created is logged, along with the record number.
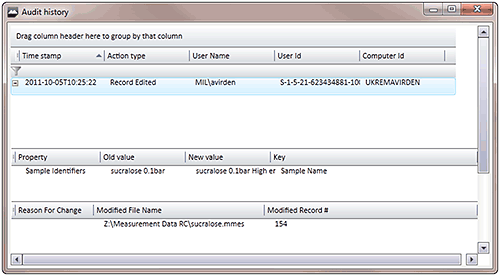
Each measurement record stored within a Mastersizer 3000 measurement file automatically contains all of the key method and analysis parameters used in creating the record, as well as a log of the user who was logged into the software at the time the record was created. This enables a full audit of the SOP settings used for record creation. Beyond this, any changes made to a record post-measurement are also audited when operating in 21 CFR 11 mode. Administrators can obtain access to this audit information from within the software's record view, by double clicking on a record and selecting the View Record Audit History option. Alternatively, the Records option within the Review ribbon bar can be used. Both of these actions causes an audit to be displayed detailing any changes which have applied to the selected records (figure 11).
|
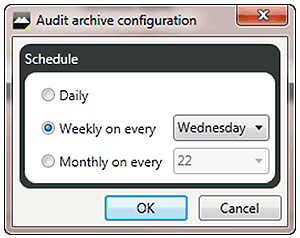
It is possible to control the approximate size of the system audit trail file by specifying how often a new file is created. This is controlled using the Schedule option within the Review ribbon bar in the software. In addition, the location of the audit file can be changed using the Audit Trail Folder option.
|
A new audit trail file can either be created every day, every week on a specific day of the week, or every month on a specific day of the month (figure 12). The period selected depends upon the usage of the Mastersizer 3000 system and the typical number of auditable events that occur in a day. This can only be assessed by the user from experience of using the system. Typical practice is to start a new audit file weekly and observe the number of events audited over that period.
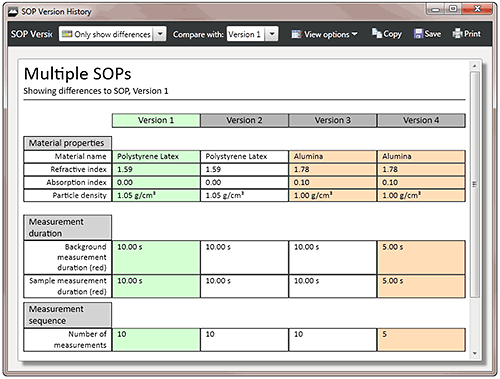
The SOP files used by the Mastersizer 3000 to set measurement conditions contain their own audit history in the form of a file version history. Each time that an SOP is edited, a new version is created and the original values are preserved. By viewing the SOP History, it is possible to see what changes have been made.
|
Administrators reviewing this information can either decide to view all of the parameters stored in each version of the SOP, or to only view those parameters which have been modified (figure 13).
When 21 CFR 11 mode is enabled, the Mastersizer 3000 software can be configured to enable the signing of records using the Enable Electronic Signatures option in the 21 CFR Part 11 section of the Options dialogue. When this option is enabled, two options become available within the Review section of the Mastersizer 3000 ribbon bar:
In addition to this, right clicking on a record within the record view provides access to a Sign-off Result function, which also allows a signature to be applied.
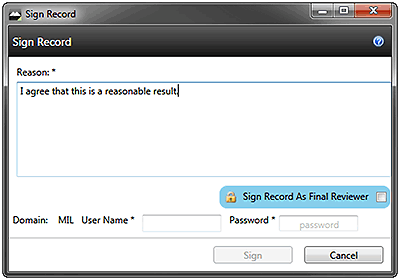
When a user decides to apply a signature, a SignRecord dialogue will appear, within which a reason for the signature can be entered and the user can also re-authenticate (figure 14). In addition, users with an appropriate level of access within the security system can decide to sign the record as a final reviewer. If this option is selected the record will be locked, ensuring that it cannot be modified.
|
Note that any signatures applied to a record are removed by the software system if the record is edited. Also, following locking, the only way of editing a record is to create a new copy of it within the measurement file. This action will also cause any existing signatures to be removed.
The security permissions that can be set for different Groups within the Mastersizer 3000 software are detailed below.
| Permission | Description |
|---|---|
| Print Report | Print reports |
| Create or Edit Reports | Create a new report |
| Delete Report | Delete a report |
| Select Reports | Choose which reports to show as tabs |
| Extract SOP | Extracts the SOP settings from a measurement record. |
| Create SOP file | Creates a new SOP file |
| Opens a SOP file | Opens an existing SOP file into the application. |
| View SOP summary report | Views the summary report of a SOP |
| View SOP History | View the history details associated with a SOP |
| Save SOP | Save an SOP in the SOP Editor |
| Save SOP As | Save an SOP under a new name in the SOP Editor |
| Save SOP As Template | Save an SOP as a Template |
| Edit Measurements | Edit measurements |
| Delete Measurements | Delete measurements |
| Copy Measurements | Copy measurements to the clipboard |
| Paste Measurements | Paste measurements between measurement files |
| Create new measurement file | Initiates the creation of a new measurement file |
| Create averaged result | Creates an averaged result for a selection of results |
| Open SOP Player | Open the SOP Player to allow creation, editing and running of playlists. |
| Initiate SOP Measurement | Initiate an SOP Measurement |
| Initiate PV SOP Measurement | Initiate an PV SOP Measurement |
| Initiate PV QAS SOP Measurement | Initiate a PV QAS SOP Measurement |
| Initiate Manual Measurement | Initiate a Manual Measurement |
| View Audit Trail With Archive | View system audit trail archive |
| View Audit Trail | View the current system audit trail |
| Archive Audit Trail | Archive system audit trails |
| Open Audit Trail Folder | Open the folder where system audit trails are stored. |
| View measurements audit trail | View audit trail for selected measurements |
| Add a user macro | Add a user macro |
| Delete macro | Delete a macro |
| Launch Accessories Control | Launches the accessory control window |
| Open Dispersant Sources Database view | Open dispersant source database view, from where the dispersants tank behavior can be configured |
| Launch Script Engine | Launches the MS3000 Scripting Engine |
| Open Engineering | Access the engineering dialog |
| Open Maintenance | Access the maintenance controls |
| Configures the engineering add-in | Configures the engineering add-in |
| Show Engineering Macro Launcher | Show the launcher for the engineering macros |
| Loads the specified engineering add-in | Launches the MS3000 Scripting Engine |
| Initiates data export | Initiates the export of measurement data into other formats |
| Create or edit new data export templates | Creates a new data export template. |
| Delete Data Export Template | Deletes an existing data export template from the system. |
| Open Materials Database | Open the database of materials |
| Open Dispersants Database | Open the database of dispersants |
| Configure record view | Configures the measurement parameters to be displayed on the record view |
| Show Current Results | Shows only the current version of records within the Records View. Previous versions are hidden. |
| Show All Results | Shows all results including previous versions in the Records View |
| Generate PV Certificate | Generate a PV certificate for the selected results. |
| View record signature history | View a record's signature history. |
| Enable electronic signatures | Enables the electronic signatures function. |
| Disable electronic signatures | Disables the electronic signatures function. |
| Non Locking Sign Off | Allows users to apply a signature which does not lock a record. |
| Locking Sign Off | Allows the final and locking sign off to be applied. |
| Change Workspace | Control the ability to change to the private workspace. |
| Modify company information | Control the ability to change the company information in the options menu. |