This note will describe how to perform the most accurate and repeatable MADLS-Particle Concentration measurement on the Zetasizer Ultra. Measuring the particle concentration of a sample is similar to measuring its size, but the sample preparation and the effect of sample measurement properties have a greater impact on the concentration measurement than for a standard Dynamic Light Scattering (DLS) size measurement. We will look at the best methods for preparing your sample, the different parameters that affect the size, and thereby the concentration value.
This note will describe how to perform the most accurate and repeatable MADLS-Particle Concentration measurement on the Zetasizer Ultra. Measuring the particle concentration of a sample is similar to measuring its size, but the sample preparation and the effect of sample measurement properties have a greater impact on the concentration measurement than for a standard Dynamic Light Scattering (DLS) size measurement. We will look at the best methods for preparing your sample, the different parameters that affect the size, and thereby the concentration value.
The Zetasizer Ultra measures the particle concentration of a sample by measuring the particle size distribution using a Multi Angle Dynamic Light Scattering (MADLS®) approach. MADLS is used to ensure the most accurate particle size is measured as this is required for the calculation of particle concentration - as we will see particle size accuracy is paramount to making a good particle concentration measurement.
The calculation of particle concentration is determined from the sample scattering intensity. Using the optical properties of the sample entered by the user, the scattering cross-sections of the particles in each size mode or population is then calculated.
The scattering cross-section is then used to determine how much light one of these particles would scatter. Combining this information with the percentage intensity that each population contributes to the total scattering intensity, the number of particles present in each population in the sample is then calculated. Or more simply, how many particles need to be present in the sample to scatter the same intensity of light as that measured.
Knowledge of the particle size for any population in the sample is critical for obtaining an accurate concentration value. The the material properties such as absorbance and refractive index of the particles will influence the data also, as they directly link to how much scattering you can expect off each particle. Other parameters that can significantly affect the data include the dispersant sample viscosity and dispersant refractive index, as these will affect the accuracy of the measured particle size.
The largest errors in a particle concentration measurement can occur when the sample needs to be diluted, in order to bring the sample into a suitable concentration range for measurement. MADLS particle concentration analysis benefits from having a wide dynamic concentration range and often dilution is not required – but the actual concentration range suitable will vary dependent on the particle size and the sample type. The range of concentration suitable is shown for several common materials in figure 1.
Just like in a regular DLS measurement, to obtain good data and an accurate particle size the sample must be free of multiple scattering, number fluctuations, restricted diffusion, and repulsive or attractive particle interaction.
In fact, MADLS is more likely to be affected by multiple scattering and number fluctuations than a standard single angle DLS Non-Invasive Back Scatter (NIBS) measurement, simply because the measurement is performed at multiple detection angles. For instance, the forward angle is more susceptible to multiple scattering due to the longer path-length of the light, while the side angle will experience number fluctuations at higher concentrations compared with the other two detection angles, due to its smaller scattering volume.
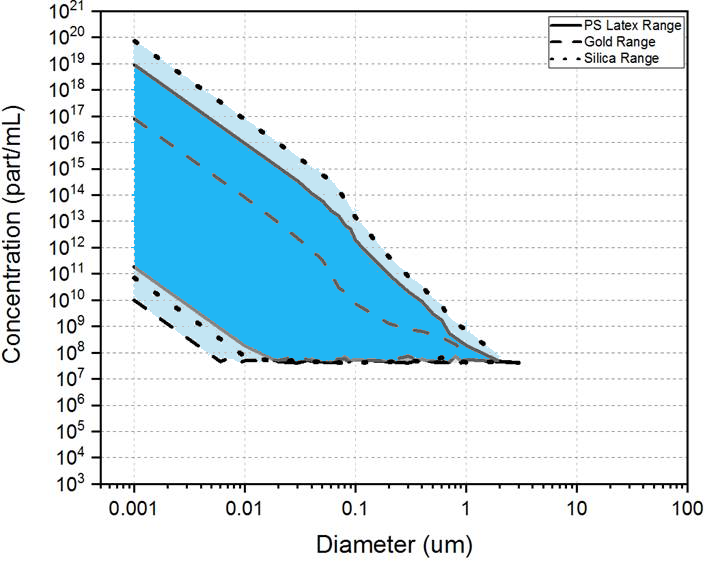
Figure 1: Plot of the calculated suitable concentration ranges for gold, silica and polystyrene particles at a range of sizes.
As can be seen in figure 1, generally samples with expected concentrations much below 1 x 10⁸ particles/mL are likely to be unsuitable. It can also be seen that as particle size increases the suitable concentration range for measurement becomes more restricted in range. Also, samples with significant particle populations above 500 nm in size are likely to be unsuitable for MADLS or concentration measurement.
A good way to check for general suitability is to run the sample, undiluted, using an automated backscatter size measurement (the default size method in ZS Xplorer using NIBS) in a 12 x 12 mm cuvette (DTS0012, PCS1115 or PCS8501) and evaluate the results. Ask a few simple questions:
Is my sample’s particle size (main population) above 500 nm in diameter?
Has the NIBS measurement chosen a cuvette position away from the centre of the cell (<4.64 mm)?
Are my size results reproducible?
Has the data quality guidance reported any issues with the data from the size measurement, especially number fluctuations (could indicate the sample is too low in concentration) or multiple-scattering (may well indicate dilution is required – especially when the measurement position is less than 4.64 mm (centre of the cell)?

Figure 2: Example of data parameters that can help guide assessment of your sample's suitability for MADLS-Particle Concentration Measurement
The need to measure at all three angles and therefore at the same detection volume in the cuvette means that the Non-Invasive Backscatter (NIBS) is not used as part of a particle concentration measurement. Therefore, samples that measure close to the cell wall for a backscatter size measurement will need to be diluted to produce an accurate particle concentration.
Samples showing data quality guidance advice indicating number fluctuations are likely to be too dilute and may need concentrating to measure well.
Samples with significant size modes above 500 nm (>10% by volume) are also likely to be unsuitable for measurement – though we are still assessing the likely errors associated with populations above 500 nm and their consequent affect on smaller populations in terms of accuracy.
Poor reproducibility in the size results (especially for the mode(s) of interest) will mean poor reproducibility in your concentration results. Seek the underlying cause of the poor reproducibility before proceeding.
If dilution is required, then look at the next section for general advice on reducing errors in your dilutions and subsequent measurements.
Dilution of a sample can introduce error into the measurement, such as if a dilution factor is used to calculate the stock concentration or when measuring a dilution series. The methods used to dispense the diluent and the sample, for example a micropipette, will have their own uncertainties that will add to any other possible errors in the measurement.
Below is table of errors that can be expected for two pipettes, a 50-200 µL and a 200-1000 µL pipette. While these pipettes are accurate there is still a relatively large error associated with the volume set on the pipette and the volume dispensed.

Table 1: Expected Errors for two pipettes [1]
The potential error in the dilution factor increases, especially in the case when multiple dilutions are performed. If a 50-200 µL pipette is used to dispense 100 µL of sample and a 200-1000 µL is used to dispense 9.9 mL of diluent, for a total volume of 10 mL, then the expected error is 2.8%. This is equivalent to 0.28 mL.
To reduce the error in the dilution factor, a gravimetric sample dilution approach can be more accurate, as it uses the masses of the diluent and sample; these values are used to calculate the dilution factor. Using at least a 4 decimal place balance, should minimise errors.

This dilution factor can then be multiplied to the measured sample concentration in order to calculate the stock concentration in particles/mL. In this example, the error in the dilution factor is 0.092%, (using a 4-place balance and d = 0.1 mg) 30 times less than the possible error using the volumes dispensed (assuming a 50-200 µL pipette).
It is important that when diluting a sample to consider the diluent used. If a particle is charged, then it’s hydrodynamic size will be influenced by the presence and concentration of electrolyte since this will help screen any surface charge and reduce the size of the electric double layer. If such a sample is diluted with deionised water then the electrolyte concentration will drop, effectively increasing the thickness of the double layer and consequently the hydrodynamic size. This will also affect the concentration measurement by causing the hydrodynamic size to increase and hence the concentration value to decrease.
This can be addressed by increasing the ionic strength of the dispersant to reach a conductivity of about 1 mS/cm, such as by adding 10mM NaCl, as discussed in ISO22412:2017. This can be seen in Figure 3 below, a plot of the concentration values of 60 nm latex when measured in differing amounts of salt. The sample prepared in de-ionised water is measured as being significantly lower in concentration to the samples prepared in NaCl solution. However, increasing to 100 mM NaCl from 10 mM NaCl only has a small effect on the concentration value as the double layer has already been sufficiently reduced.
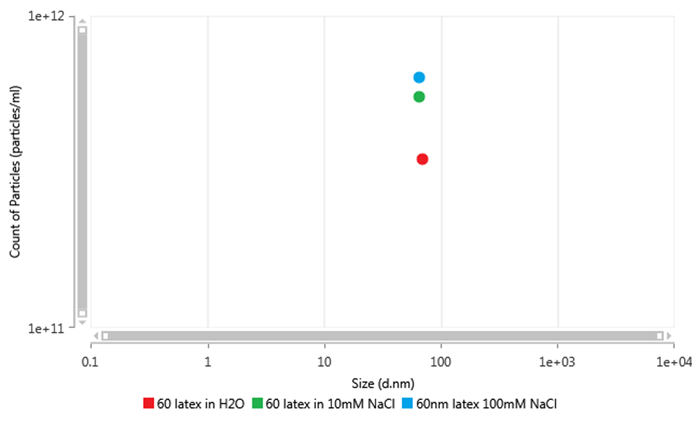
Figure 3: Scatterplot of particle concentration measurements of 60nm latex prepared in ultrapure water (red), 10mM NaCl (green) and 10mM NaCl (blue)
While adding 10 mM NaCl is important to samples dispersed in water, it is not always required for other dispersants such as buffers of already sufficient ionic strength. Also, care should be taken that the particles in the sample will not react with ions being added to increase the ionic strength such as with NaCl and silver ions. In this case the silver ions react with the chloride ions present in the solution to produce silver chloride.
Another property to be aware of, especially when diluting the sample, is that of the sample viscosity which if not accounted for in the measurement settings could cause an error in the particle size and hence the particle concentration.
The reason that viscosity is important for a concentration measurement is the same reason it is important for a size measurement, namely the viscosity of a sample changes the rate of diffusion of a particle in the sample. Therefore, when using the diffusion rate of particles to calculate the particle size, the viscosity of the dispersant must be used to obtain an accurate size. If the viscosity value is incorrect then the size value measured will also be incorrect. In the particle concentration measurement, the viscosity values effect on the particle concentration is even greater than what it is for a size measurement. This is because the size value is used to calculate the concentration and the dependency that goes into the calculation is 1/d6 which means, that a 1% change in size (due to an error in viscosity) would be an almost 9% change in particle concentration value.
For example, if the viscosity used in the software is higher than the true viscosity, then the apparent size will tend to be smaller. This in turn means that the expected scattering is less per particle, due to the smaller scattering cross-section. Consequently, as the intensity scattering value is used to calculate the concentration it is to be expected that the determined particle concentration will be higher than the true concentration. Conversely, if the viscosity is set lower than the true viscosity, the apparent size is larger than the true size and the particle concentration will be smaller than the true value. These are simple relationships and the actual Mie scattering intensity vs size can further complicate this relationship between size and concentration.
This simple relationship is demonstrated in Figure 4 below. The viscosity value for a 100 nm polystyrene sample dispersed in 10mM NaCl solution has been changed from 0.8872 cP (red graphs) to 1.0 cP (green graphs). This has caused a size shift from 101 nm to 90 nm (a decrease of about 10%) but the concentration has shifted from 3.56 x 10⁸ particles/ml to 7.09 x 10⁸ particles/ml (an increase of about 100%).
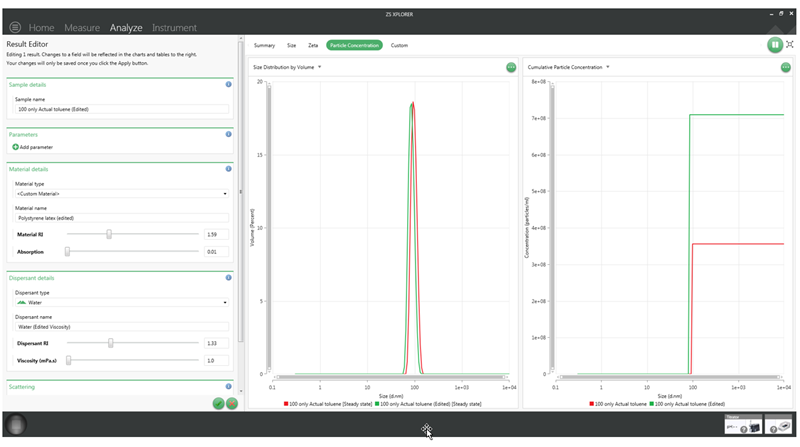
Figure 4: A screenshot of the software showing a particle concentration measurement of 100nm polystyrene with viscosity values of 0.8872 cup (red) and 1.0 cP (green).
Errors due to the viscosity can be avoided by choosing the correct dispersant in the ZS Xplorer software when setting up a particle concentration measurement. If the dispersant that is in the sample is not available, then instead a dispersant already in the software can be edited or a new one added as shown in Figure 5 below.
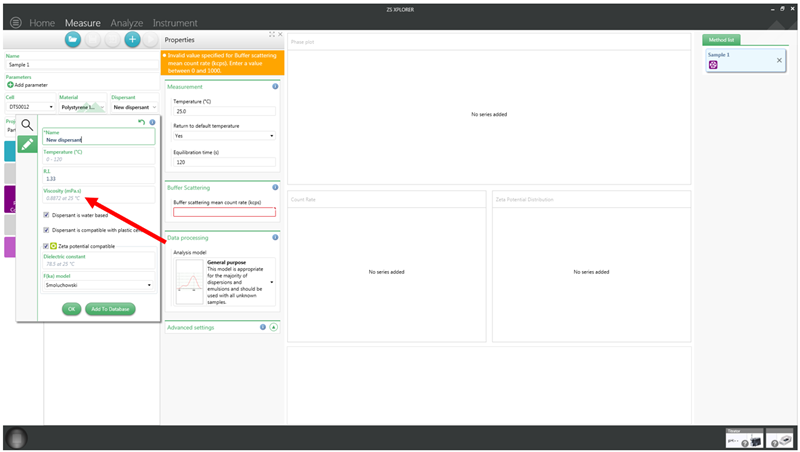
Figure 5: Adding a new dispersant to the ZS Xplorer software
Here the viscosity value of the sample can be entered if it is known. If the value is not known, then it can be determined experimentally using a size standard in the dispersant and the software. The method for doing this is shown in the link below:
However, rather than calculating the viscosity, as in the application note, the edit result function in the software can be used to adjust the viscosity of the dispersant until the size result matches that of the standard when measured in 10mM NaCl solution, as shown below in Figure 6.
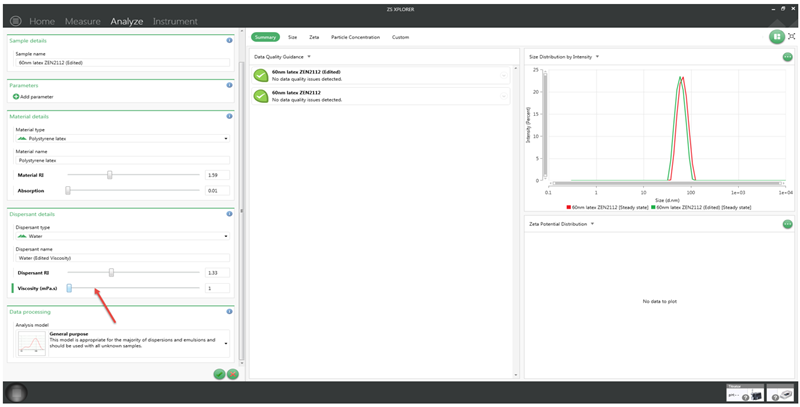
Figure 6: Editing the viscosity of a size measurement in ZS Xplorer software
For both the material and dispersant, if the refractive error (RI) values are incorrect then this will influence the accuracy of the concentration value measured. For the material, both the refractive index and absorption of the material is used in the measurement for the particle concentration. Each value is used with the particle size to calculate the scattering cross section or how much light each particle scatters.
The effect of an error in either of these two values on the concentration result can vary. If the particles being measured have an absorption of zero or close to zero, such as polystyrene (absorption of 0.01), then the error in the RI will be limited. For example, if the material selected in the software is silica but polystyrene is the actual material used, then the final concentration value can be expected to be about four times greater than expected. This is shown in Figure 7 below.
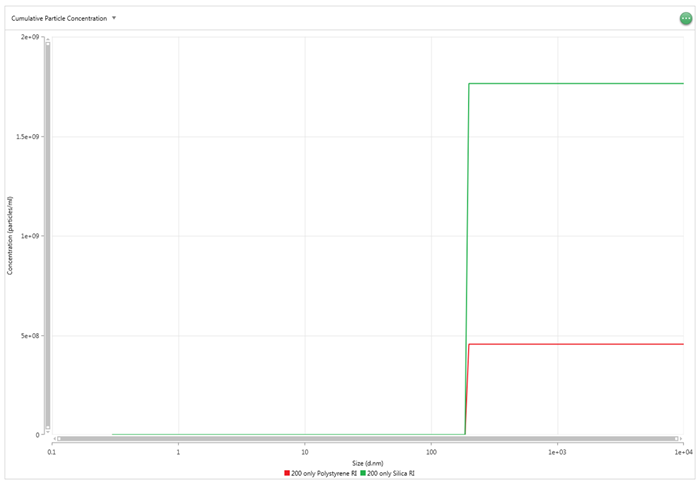
Figure 7: Cumulative concentration values for a 200 nm polystyrene sample with RI values for polystyrene (red) and silica (green)
However, if the absorption of the sample is significantly higher than zero,such as Fe3O4 (0.071) or gold (3.443), then the error that can be expected is harder to quantify. This is because the high absorption values cause the change in particle concentration to be non-linear with the change in RI.
Overall, it is important that the correct material is selected in the software, or a new material is added with the correct RI (as shown previously for a new dispersant) or at least a material that can be expected to have a similar RI to the actual particle is selected to minimise the error due to RI.
However, if the absolute concentration value is not required but instead the repeatability and relative concentration of the results is most important then, if the same material is selected for each measurement the RI value will not impact the repeatability of the measurements.
The dispersant RI is used as part of the calculation of the size values, a too high dispersant RI causes the size to increase which also then causes the concentration to decrease and vice versa. However, the effect of an error in the dispersant RI is less than the material RI. As most dispersants have similar RI values if the wrong dispersant is selected, the concentration result will typically still be within the correct order of magnitude.
The buffer scattering count rate is used in the particle concentration to remove the “background” scattering from the total scattering given off by the sample, like using a background trace in a UV-Vis absorption measurement.
Errors in the value for this parameter will, for most samples, only have a minimal effect on the concentration value measured. This is because the scattering from the dispersant being used makes up a very small portion of the scattering from both the dispersant and the particles in the sample. Hence, for most samples that are not of low concentration and/or low scattering can use a typical scattering value if only an approximate concentration measurement is required. For these sorts of samples, the error that could be caused by an incorrect dispersant scattering value would only be seen in the second decimal place. Some examples of typical scattering value are given below:
If a precise particle concentration value is required, or if the sample is of a low concentration and/or is a low scattering sample (such as a sample that is measured using attenuator 10 or 11 in backscatter), then the count rate of the dispersant can be measured. This is demonstrated in Figure 8. The dispersant being used should be put into the same cell type that the sample will be put into and inserted into the instrument.
Then a backscatter size measurement should be set up for the dispersant, ensuring the correct cell type is chosen. The other settings can be left as the default except in the advanced settings set the positioning method to measure at centre of cell (unless this setting cannot be changed such as for the ZEN2112 low volume quartz cell).
Also, set the attenuator to 11 and finally, set the measurement process to manual with 20 size runs and a run duration of 1.68s. This will be enough to get an accurate count rate measurement but will ensure the measurement is not too time consuming.
The instrument will then perform a size measurement, however, the only result from the measurement that is required is the derived count rate value.
Once the measurement is finished, on the Analyze page select the project the dispersant measurement was saved in, select the cog icon and add derived count rate to the records view. Then use the count rate value in the record (which is in kcps) when setting up the particle concentration measurement as the buffer scattering count rate.
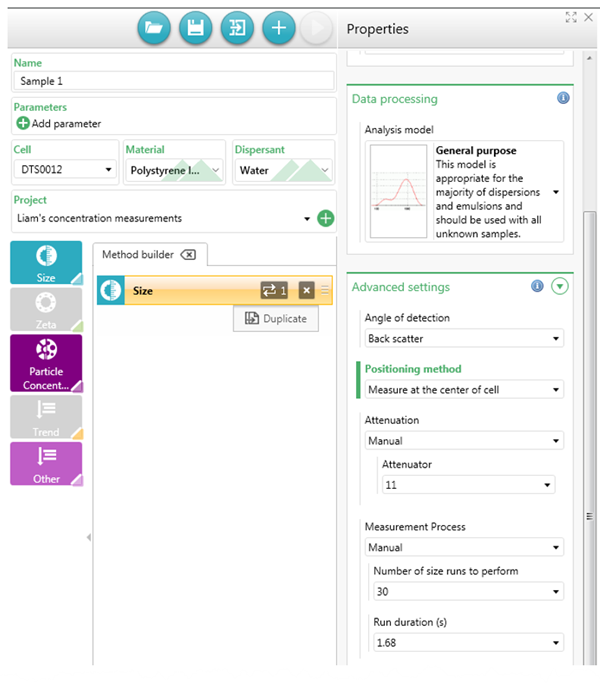
Figure 8: Setting up a size measurement to record the scattering count rate
Once the sample has been prepared the measurement can be started. Setting up a particle concentration measurement is very similar to setting up a size measurement.
First, the sample information is entered, such as sample name and any parameters that are relevant for the sample, such as batch number.
Second, select a concentration capable cell. The cells that are compatible are shown below in Figure 6 below as well as the minimum volume available for each.
Third, as discussed it is important that for an accurate measurement the correct material and dispersant is selected.
An error in the RI properties of the material and dispersant will affect the concentration value. Therefore, either measured or literature values should be used for these types of samples.
The particle concentration measurement can then be selected by either clicking or dragging the icon into the method builder.
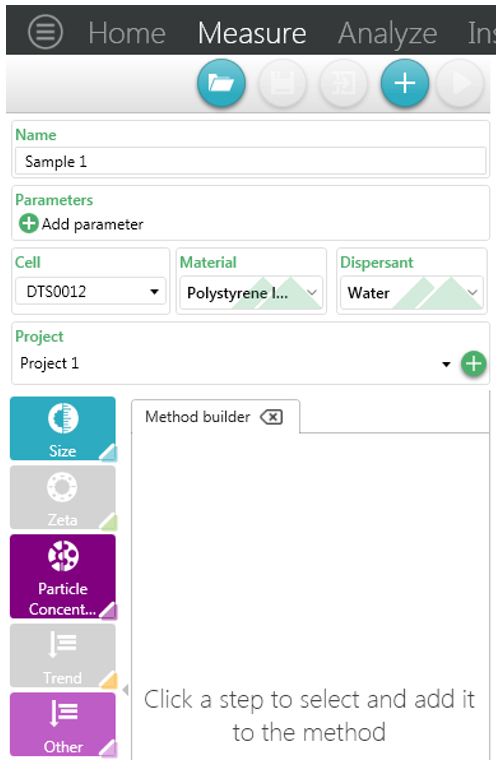
Figure 9: Entering sample details and selecting the particle concentration measurement
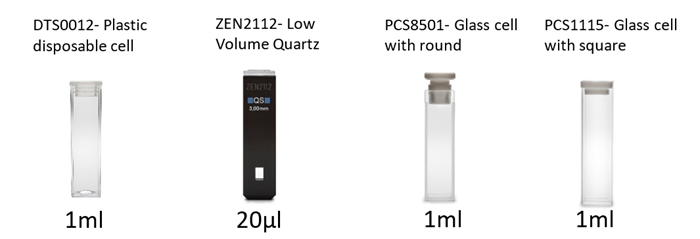
Figure 10: Cells that are compatible with the particle concentration volume and their minimum volume
Once the particle concentration measurement has been added to the method builder an orange box appears, warning that the dispersant count rate needs to be entered. The measurement cannot start until this has been done. Either use the nominal values shown above, for samples showing good scattering, or use the actual dispersant scattering intensity determined as outlined previously. Once this is input the measurement can then be started.
Once the particle concentration measurements have finished, the results can then be looked at in the Analyze tab in the software. In the Analyze tab, the record selector can be found which can be used to display the total particle concentration in particles/mL. As well as this if the Particle Concentration workspace view is selected, on the right of the software four graphs will be displayed. These are shown in Figure 11 below.
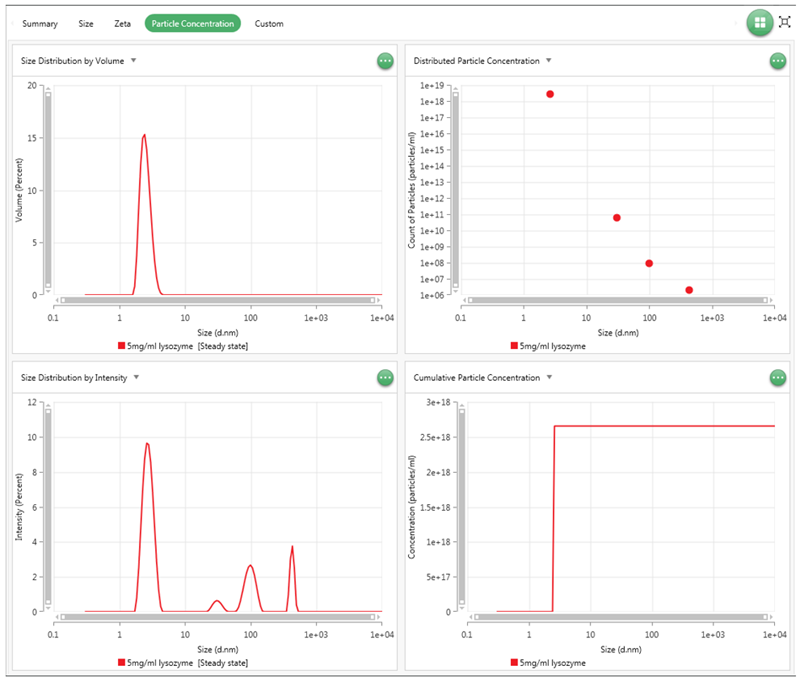
Figure 11: Graphs available in the Particle Concentration View. Top Left: Size distribution by Volume, Top Right: Distributed Particle Concentration, Bottom Left: Size Distribution Intensity, Bottom Right: Cumulative Particle Concentration
The two size distributions display the MADLS® size result for the Intensity and Volume distribution. Then, the two concentration graphs are the Distributed Particle Concentration, which displays the concentration value for each size population measured in particles/ml, and the Cumulative particle concentration which displays the total concentration as the size increases. The Distributed Particle Concentration is useful for displaying the concentrations of populations with markedly different concentrations and the cumulative concentration graph is useful for seeing the total concentration or comparing populations with similar concentrations.
Once a particle concentration measurement has been made, it is good practice to check the Data Quality Guidance advice for each individual angle. Ideally, the advice should display either that no issues have been detected or that there are multiple populations in your sample. If there are other issues detected, then these should be addressed to improve the accuracy of the measurement.
The issues that can be expected to be most common are related to concentration such as number fluctuations when the concentration is too low or multiple scattering when it is too high. It is possible to see both these issues for the same sample with a low concentration detected at side-scatter and a high concentration at forward scatter. In this case the low concentration in side-scatter should be the priority to address as this will have the greatest impact on the measurement, for both accuracy and repeatability. A measurement with multiple scattering in the forward angle, while not ideal can still be used to make relative comparisons between measurements.
When analysing particle concentration measurements, if the advice in this guide is followed then measurement should show good levels of repeatability. The repeatability of the particle concentration measurements relies heavily on the size measurements also being repeatable as any error in the diameter is scaled by 106. If the size measurements are repeatable to within 1% RSD then we would expect that particle concentrations measurements would show around 10% variance, higher variance in the concentration results will increase the variance in size results with 7% RSD expected to produce around 40% variance in the concentration results.
The most important factor that contributes to an accurate particle concentration is to measure the size as accurately as possible. This is accomplished by ensuring viscosity of the dispersant is corrected for and that any electric double layer of solvent molecules is suppressed if possible, by, for example, by adding a low amount of salt to the sample. As the size is used to the power of six in the calculation of the particle concentration, errors in size will have the greatest effect on the concentration value calculated. The second most important set of parameters is the material RI and absorption, as these are used to calculate the amount of light that we can expect to be scattered from one of these particles (of this size).
Other parameters that can potentially affect the results, but to a much lesser extent are:
The buffer or dispersant scattering - this becomes important for low concentration samples where you are working close to the detection limits for one of the measurement angles (typically this will be reached with the side angle first).
The dispersant RI - this has less of an impact than the material RI and choosing the correct dispersant from the software or one that is similar should be sufficient.
Finally, some words on sample preparation for concentration measurements, especially if the samples are diluted. We would recommend gravimetric dilution as this allows minimization of any errors in sample preparation and which gives a reasonably accurate value of your stock concentration.
[1] Gilson Pipette Specifications (Accessed 04/07/2018): http://www.gilson.com/Resources/LT380069-05%20Pipette%20Specs%20Chart_No%20Spreads.pdf