This document provides details on how to use the 21 CFR Part 11 features provided for the Morphologi instruments.
The intended readership is the system administrator. This is defined as the person responsible for the security and 21 CFR Part 11 compliance of the instrument. Some knowledge of the Windows™ operating system is assumed and some familiarity with the instrument software is also assumed.
It is assumed that the software has been installed in accordance with the guidance provided by the relevant Software Update Notification (located on the Application CD) and that the feature key, CPS0036, has been installed.
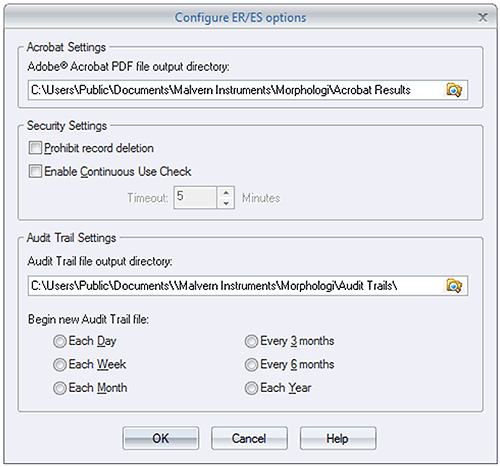
Selecting Tools→Settings→ER/ES Settings will bring up the dialogue shown in figure 1. If this menu item is grayed out, the 21 CFR Part 11 Feature Key will not have been installed.
The PDF file output directory is the location where reports generated at the end of a measurement SOP will be stored. It is recommended that these reports be held on a centralized file server in order to comply with the 21 CFR Part 11 regulations about data preservation (Figure 1).
|
It is possible to control individual user's ability to delete records using the Group Permissions in the security configuration.
However, for strict compliance to 21 CFR Part 11, it is also possible to prevent record deletion for all users by checking the prohibition option on the Configure ER/ES settings screen (Figure 1)
In order to ensure that the person operating the system is actually the person identified by the access control system, it is possible to configure the software to monitor the system usage. If the software remains idle for longer than a period specified, the user will be logged out. To enable this feature, check the option on the Configure ER/ES settings screen (Figure 1) and configure the Timeout period.
The Audit Trail file output directory is the location where the Audit Trail files will be stored (Figure 1). It is recommended that these reports be held on a centralized file server in order to comply with the 21 CFR Part 11 regulations relating to data preservation.
It is possible to control the approximate size of an audit trail file by specifying how often a new file is created. The period depends upon the usage of the system and the typical number of auditable events that occur in a day. This can only be assessed by the user from experience of using the system. Typical practice is to start a new audit file weekly and observe the number of events audited over that period, and then adjust the audit period to suit system usage.
After the specified period has passed, the application will automatically begin a new audit trail file. The new file name will be automatically recorded at the tail end of the previous file in order to maintain a continuous audit trail.
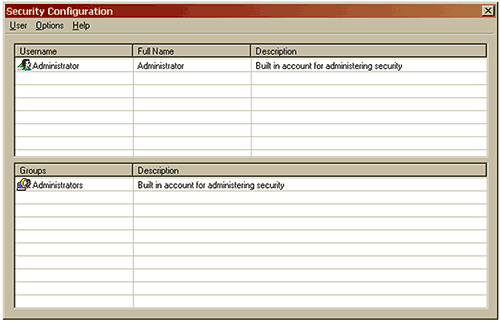
The configuration for the security system, Figure 2, can be found under the Security menu. The security system is similar to the Windows operating system security and should be familiar to most advanced users.
|
It is possible to configure the security system in such a way as to prevent any user from logging in to the system. To avoid this situation, make sure that you do the following:
1. Configure a group with permission to edit user settings.
2. Ensure that there are at least two users that are members of this group.
3. The first user should be the individual responsible for administering the security settings of the machine.
4. The second user should be a pseudo account. The user name and password for this account should be recorded and stored in a secure but well known place. This might be in a sealed envelope held in the company safe or with a trusted individual such as the head of the I.T. department. This will permit access to the security system should the other user become unavailable.
Security is disabled by default to allow free access to the software. The administrator of the system should configure the users and groups before enabling the security system.
Once the users and groups are configured, access and configure the security settings.
Finally check the Enable Security check box. For 21 CFR Part 11 enabled systems, it will not be possible to disable the security once enabled.
A group defines a set of access rights that may be granted to member users. An access right allows or prohibits use of a specific feature of the software. The access rights are detailed in the Appendix.
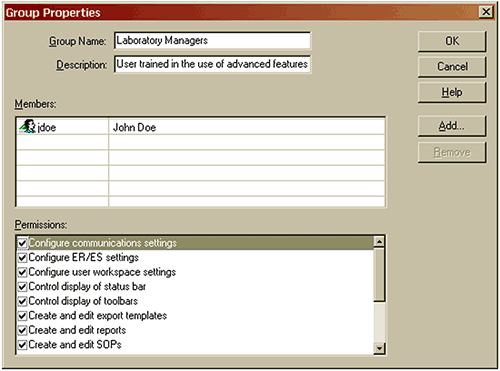
Is an alias for the group. This is usually a descriptive name for either a level of access or a job function. Commonly defined groups are Operators, Supervisors and Administrators, see Figure 3.
|
Contains a more detailed description of the group.
The list of users who are members of the group. Each member has the access permissions that the group allows. Users can be added to a group either as part of the user creation process or the group creation process.
The list of access permissions conferred by membership of a group. Any user who is a member of the group will be granted access to a software feature if the relevant permission is checked.
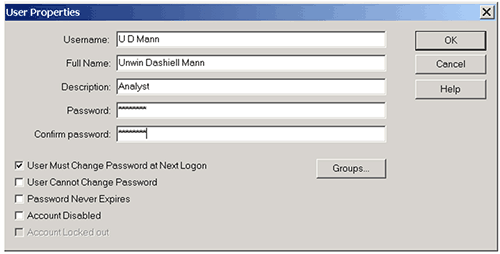
Once suitable groups have been defined, the next step is to add the users to the system, see Figure 4. It is possible to add a single user by clicking Users/New User in the Security Configuration Menu. Rapid addition of existing users to a new Group can be done by double clicking an empty line in the Members section of the Group Properties dialogue for that Group. This action will cause the whole list of existing users to be displayed and selected users can be highlighted as a group. Clicking "OK" will then add all the highlighted users to the new Group.
|
Each user must have a unique user identifier and should be a member of at least one group. Any local SOP for security configuration should be followed but a typical practice is to use the initials and surname of a user as the user identifier.
The full name is the printed name of the user. This is the full name of the individual and may be placed on reports to identify the individual who made a measurement.
This is typically the user's job title or function.
The password field is where you enter the password. For security reasons, the password is not displayed. It will also be noted that the number of symbols displayed may not necessarily map exactly to the password length.
A typical practice to preserve the security of user's passwords is for the administrator to agree a temporary password with the user, (this must not be the user's final password), and check the option to force the user to change this password at the next logon.
If this field is checked, users will be asked to change their passwords the next time that they log on to the system. This allows the administrator to set temporary passwords for new users or users who have forgotten their passwords.
If this box is checked, the user will not be able to change the password unless it is the first time that a user has logged in and the system expects the user to change the password at the next logon.
This box should only be checked in special circumstances such as for an administrator account to be used in emergencies.
Checking this box prevents the password expiry setting from applying to this user.
This box should only be checked in special circumstances such as for an administrator account to be used in emergencies.
Checking this box prevents the user from logging in to the system. This box should be checked when a user leaves the company or no longer is allowed access to the system. Under 21 CFR Part 11, user's information must be retained for the full period of record retention. This option allows access to be prevented without removing the user details from the system. Many companies will use this feature to suspend an account while the user is on vacation.
This box will be enabled and checked if a user has been denied access by the security system. The administrator is able to allow access again by clearing this check box.
This will typically happen when users forget their passwords and have made more than the allowed limit of logon attempts. It may also be an indication of an attempt to logon by an unauthorized user.
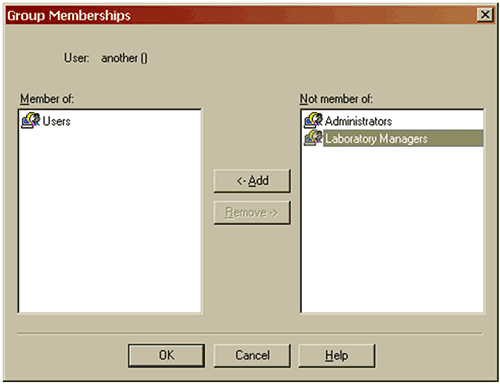
This can be done in two ways. In the edit user screen, pressing the Groups… button will list the groups available for the user to join. Pressing the Add button will include the user in the selected group or groups. (Figure 5)
|
Where users are members of more than one group, it should be noted that if a permission is granted in one group, it will override any denial of the same permission in another group. In this way users have the sum of all the permissions in the groups they belong to. Administrators should be aware of this and be sure that they are familiar with the permissions which membership of each group confers on members.
It is also possible to add users to groups by pressing the Add button in the group properties screen. This will then list the users who are available to add to the group. The Remove button works in the reverse direction when members are to be removed from a group.
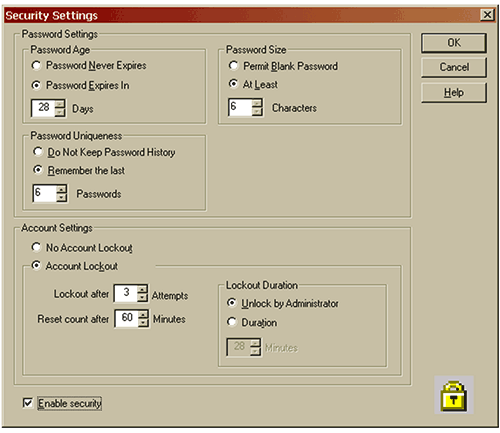
Security > Configure Security >Options > Security Settings will give access to the Security Settings screen. (Figure 6)
|
It is possible to force users to change their passwords after a period of up to 365 days has elapsed. Once the password has expired, users will be prompted to confirm their existing passwords and specify a new one. In conjunction with the password uniqueness option, this can force users to regularly review their passwords.
This facility should be used with caution. If users are too frequently forced to change their passwords, it is common for them to forget them or worse to write them down, thereby defeating the original purpose of the security system.
Each time that a user enters a new password, it can be checked against a list of up to 32 previous passwords held in the software to ensure that fresh passwords are used.
It is recommended that if this feature is used, the size of the password history list should be limited to between 3 and 6 passwords. Any fewer and users will not have to review their passwords. More will force users to choose unfamiliar passwords and will increase the possibility of passwords being written down.
It is possible to specify the minimum length for a password up to 32 characters. As a rule of thumb, the shorter a password is, the easier it is to guess. However, if it is too long, users will not be able to remember their passwords. 6 characters is generally a good compromise.
The software monitors each user's attempts to log in. If the user fails to enter the correct user identifier and password combination, the software will record this and can optionally deny future access to the software.
It is possible to specify the number of unsuccessful attempts allowed (up to 10) before users are locked out. This count will be reset after a specified period of time to allow for genuine users forgetting their passwords.
If users exceed the allowed number of attempts, the software can either lock them out of the system for the specified period or require the intervention of another user with Administrator privileges to unlock their accounts.
If the username in the security Configuration screen has an icon with a cross through it, that users access capability has been disabled.
If the username has an icon with a padlock next to it, that user is locked out and the administrator should establish the reason for this before unlocking the account to re-admit a bona-fide user.
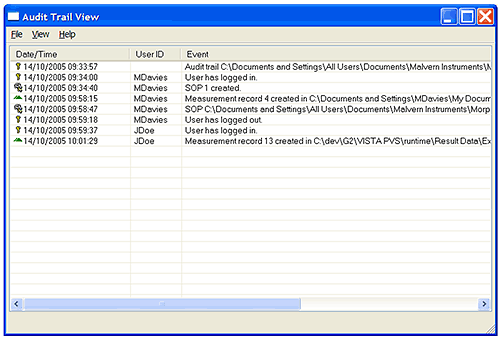
The application software records system events in the system audit trail. This is a record of the application starting and closing, security events such as logging in and out of the system, and file events such as creation and deletion of measurement records and SOPs (Figure 7).
|
Use the File Open menu to view audit trail files other than the currently active one viewed by default. Using the File Export menu option it is possible to export the audit trail file contents to an ASCII file for review and printing.
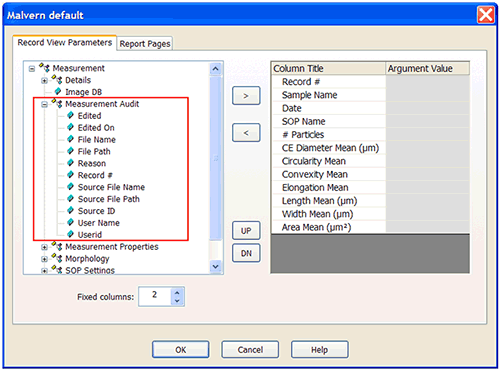
Measurements cannot be edited. If changes are made to a measurement, a new measurement record is created at the end of the file. In the application, each record contains Audit Information allowing the user to view audit information in the record view (Figure 8).
|
Instructions for configuring the workspace are available in the application's online help.
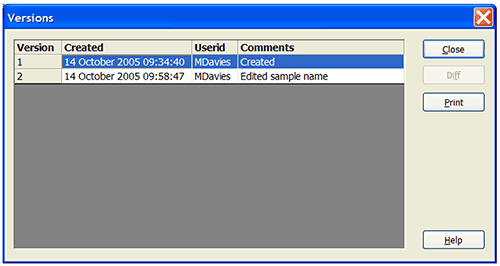
The SOP files contain their own audit history in the form of file versions. Each time that an SOP is edited, a new version is created and the original values are preserved. By comparing the versions of the SOP file, it is possible to see what changes were made and by whom.
Pressing the Versions… button will display the version history of this SOP file (Figure 9).
|
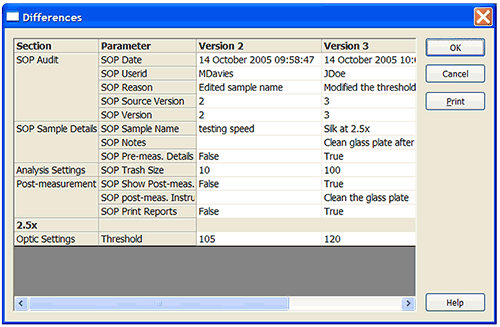
To see the changes made between two versions of the SOP, select the two required revisions and press the Diff button to display the Differences screen (Figure 10).
|
The differences screen displays three columns; the parameter name for each parameter that has changed and the value of that parameter for each of the two versions. The fact that the SOP file has a new revision will also be recorded in the system audit file.
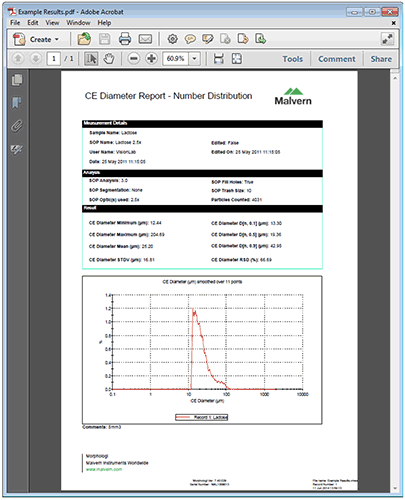
The application software does not directly support electronic signatures. The application will integrate with the Adobe Acrobat™ package and allow reports to be created as Portable Document Format (otherwise known as PDF) files automatically at the end of each measurement. These report files are held in the Acrobat Results folder specified in the ER/ES Settings. The file name for these report pages will be the Measurement file name followed by the record number of the result in question.
Once reports have been generated, the Adobe Acrobat package can be used to electronically sign them using either the Adobe Self-Sign technology or a third party digital signature solution such as VeriSign™. The Adobe Acrobat Self-Sign solution is fully compliant with 21 CFR Part 11. The Adobe Knowledge base document 323231 details the compliance. It can be found at http://www.adobe.com/support/techdocs/323231.html.
If the document is not displayed, using the document number (323231) as the search clue on the Adobe web site search engine will bring it up.
|
The Morphologi software suite uses a series of different file types in order to store data and measurement settings. The default directory's that user data will be stored are:
Configuration Data - C:\ProgramData\Malvern Instruments\Morphologi
Measurement Data - C:\Users\Public\Documents\Malvern Instruments\Morphologi
Files produced by Morphologi should be protected from deletion by using the operating system security features. The files and their default directories that need to be protected are:
| File Type | Extension | Default Path |
|---|---|---|
| 21CFR11 mode: Audit trails | .adt | C:\Users\Public\Documents\Malvern Instruments\Morphologi\Audit Trails |
| Measurement data | .vmes | C:\Users\Public\Documents\Malvern Instruments\Morphologi \Result Data |
| Reports | .vrep | C:\Users\Public\Documents\Malvern Instruments\Morphologi \Reports |
| SOP | .vsop | C:\Users\Public\Documents\Malvern Instruments\Morphologi\SOP |
NOTE: This is simply a recommended subset, the user may wish to restrict other file types
The "No Delete" security permission within the Windows operating system allows users to access data files or directories (a requirement for running all Malvern software), but prevents deletion and renaming. It can therefore be inferred from this that the user should not subsequently be allowed to:
Have full control over the security permissions
Take ownership of the security permissions
Change security permissions
A user installing a Malvern software product might want to create a custom directory structure unique to their operation, in this case these user-defined data directories should be assigned the security permissions.
It is assumed that you have the required administrator rights for the system upon which the Morphologi software is being installed; allowing you to install or update software and configure windows security permissions.
Permissions will need to be configured for each user profile.
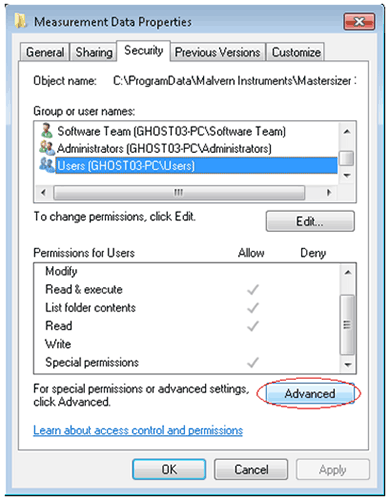
Navigate to each of the directory folders that need to be secured in turn, right-click on it and through the context menu open the folder properties, switch to the security tab and open the advanced settings, see figure 12.
|
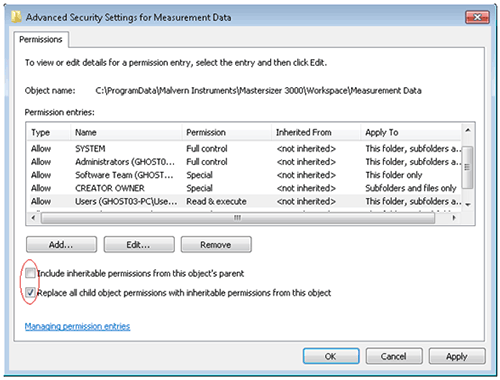
Clear the checkbox 'Include inheritable permissions from this objects parent', shown in the figure 13.
|
If a warning is displayed, click Add. This will prevent modifications to parent directories overriding the changes we are implementing. Check the 'Replace all child object permissions…' shown above. This will apply the changes we make to permissions for all files in this directory.
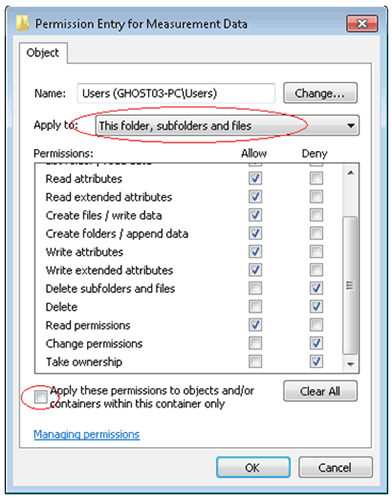
Select the Users group and Edit the groups' permissions. This causes the Permission Entry window to appear, see figure 14.
|
Allow access to all permissions with the exception of:
Full Control
Delete subfolders and Files
Delete
Change Permissions
Take Ownership
Ensure that the Apply To setting is changed to This folder, subfolders and files. Clear the 'Apply these permissions to objects…' checkbox as shown in figure 14
Repeat this procedure for the other directories.
NOTE: Do not apply these permissions to the following directories:
C:\Users\Public\Documents\Malvern Instruments\Morphologi\Temp (This will prevent the user from running measurements as the temporary files are created whilst a measurement is running and deleted at the end when the result is saved)
C:\Users\Public\Documents\Malvern Instruments\Morphologi\Acrobat Results (this will prevent the user from creating PDFs, unless the PDF is saved to a different, uncontrolled folder)
C:\Users\Public\Documents\Malvern Instruments\Morphologi\Raman Data (this will prevent the user from exporting spectra, unless they are to be saved to a different, uncontrolled folder)
As a general rule, this should be done by the administrator in consultation with the most senior operator, the Qualified Person for the Lab or the laboratory supervisor.
| Permission | Description |
|---|---|
| Configure Communications Setting | Allow the user to modify the serial port to which the instrument is connected.
This feature should be restricted to advanced users. Once the software is installed, it should not be necessary to modify the communications settings. |
| Configure ER/ES settings | Allow the user to alter the ER/ES settings.
In a 21 CFR Part 11 environment, this feature should be restricted to the administrators of the system. |
| Configure user workspace settings | Allow the user to configure the workspace settings such as which reports are available and which parameters are displayed in the record view.
You may wish to pre-configure the workspace for all users and confine changes to the more advanced users. |
| Control display of status bar | Allow the user to show or hide the status bar at the bottom of the application window.
The status bar displays useful help and diagnostic information and should not generally be removed. |
| Control display of toolbars | Allow the user to show or hide toolbars at the top of the application window.
The toolbars provide quick shortcuts to commonly used features of the software and should not generally be removed. |
| Create and edit export templates. | Allow the user to create or modify templates for the export of data.
You may wish to pre-configure standard export templates and confine access to this feature to advanced users. |
| Create and edit reports. | Allow the user to create or modify reports.
You may wish to pre-configure standard reports and confine access to this feature to advanced users. |
| Create and edit SOPs | Allow the user to create and modify SOP settings.
You may wish to pre-configure standard SOP files for your product range and confine access to this feature to advanced users. |
| Delete Results | Allow the user to delete results.
In a 21 CFR environment, this permission should not be provided to any user. This facility is provided for a mixed environment where some users do not operate under FDA regulations. |
| Edit Line Styles | Allow the user to modify the line styles used in graphing.
You may wish to pre-configure acceptable line styles and confine access to this feature to advanced users. |
| Edit Results | Allow the user to create a new result by modifying the analysis parameters and recalculating the result.
Since no data is changed or obscured in the original record, access can be granted to any user. |
| Edit User Settings | Allow the user to modify the security settings and manage the users and groups.
Access to this feature should be confined to administrators of the system. At least one user must have access to this permission. |
| Make a measurement | Allow the user to make a measurement.
This feature is required by any user wishing to make a measurement but may not be required by the system administrator. |
| View Audit Trail | Allow the user to view and export the audit trail files.
Access to this feature should be confined to the administrators of the system. |