
This guide takes you through the steps required to align and optimise the resonating canitlever sensor within the Achiimedes when using software version 1.21. This procedure must me applied before making measurements with your Archimedes.
Before a measurement can be made, the sensor must be aligned and optimized. These protocols describe how this is carried out using software version 1.21. If a software update is required, please contact your local Malvern Panalytical representative. For ease of use, there is a scripted “Set up System” feature in the software to guide you through this procedure.
1. Open the Setup view in the top-left menu of the Archimedes software and select “Replace Sensor”.
2. After the vials have been vented, unscrew the sensor clamp (Figure 1) and replace the current sensor with the sensor to be used. Be sure to tighten the clamp screws firmly to prevent leaks.
3. Enter the serial number of the sensor into the software and ensure that you have selected the correct sensor type, press OK.
4. Change the load time to 180 seconds and press enter.
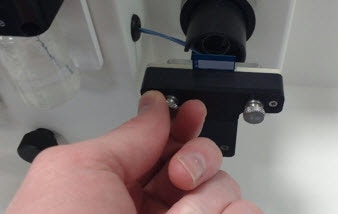
Figure 1. Unscrewing the sensor clamp to replace the sensor
1. Open the Setup view in the top-left menu of the Archimedes software.
2. Using the “Inlet View” in the Video pane, focus the lens using the ring (Figure 2) so that the image is at its sharpest as per Figure 3. If the Inlet is not visible, use Sensor X and Y controls (Figure 4) to re-position the beam on the cantilever in sensor view before focusing.
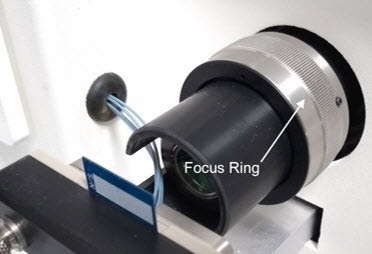
Figure 2. Position of the Focus Ring that is used to focus the camera image and SLD beam

Figure 3. Out-of-focus inlet (left) and in-focus inlet (right) visible in the Inlet View section of the Video pane. NOTE the exact shape of the inlet may differ
3. Using the “Sensor View”, move the beam over the cantilever using the Sensor X and Sensor Y dials (Figure 4) so that the Sum voltage is at its highest.
• MICRO SENSORS – Move the beam between a quarter to a third of the way down from the top of the cantilever (Figure 5).
• NANO SENSORS – Move the beam onto the circular section of the cantilever (Figure 5).
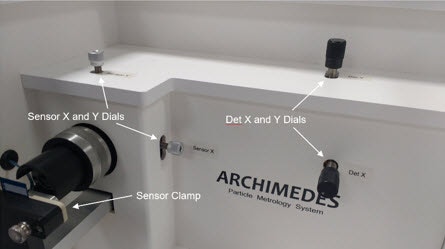
Figure 4. Front panel of the Archimedes instrument showing the locations of the Sensor and Detector alignment dials
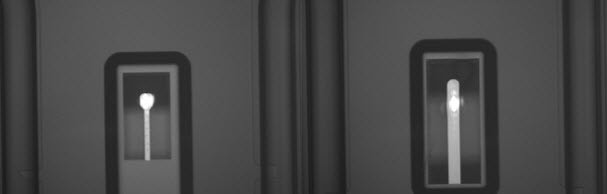
Figure 5. Standard positioning of the beam on a Micro (left) and Nano (right) sensor cantilever
4. Using the “Alignment” grid, move the green diamond into the centre of the axes (Figure 6) using the Det X and Det Y dials (Figure 4).
5. Select “Optimise Amplitude”.
6. If Sum, Amplitude, and Baseline levels are all green (Figure 6), continue to the next step. If not, realign the sensor. If the criteria still cannot be met, select “Replace Sensor” and start from the beginning of the process. If the criteria are still not met, please contact your local Malvern Panalytical representative or the Malvern Panalytical Helpdesk.
7. Load the sensor with ultra-pure water for 120 seconds. If many peaks in resonant frequency are visible in the frequency counter (Figure 7), the water being loaded is likely unclean. Load with fresh deionised water, then clean the sensor.
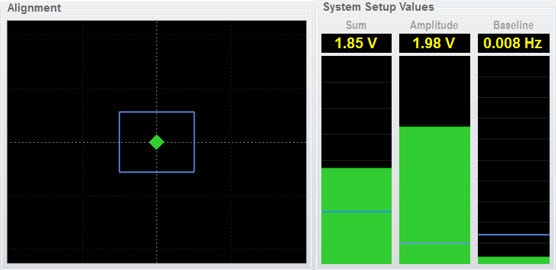
Figure 6. Correct positioning of Alignment grid (left and expected System Setup Values (right)
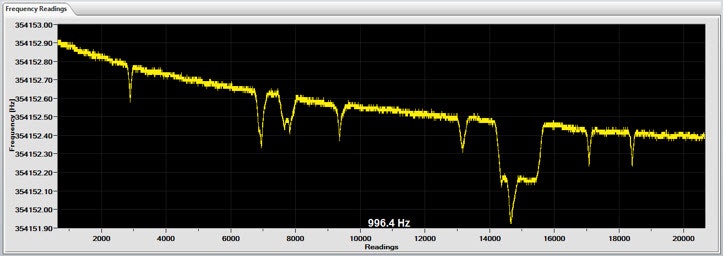
Figure 7. Particles on the frequency reading counter from an unclean sensor
The Archimedes is now ready to be calibrated. If the Archimedes is not going to be used to perform measurements immediately, load ethanol into the system at both the Sample and Reference ports for 60 seconds and switch the instrument off.
If assistance is required in the setup or use of the Archimedes, please contact your local Malvern Panalytical representative or contact the helpdesk.
Other Basic Guides for Archimedes systems for resonance mass measurements are available: